Save
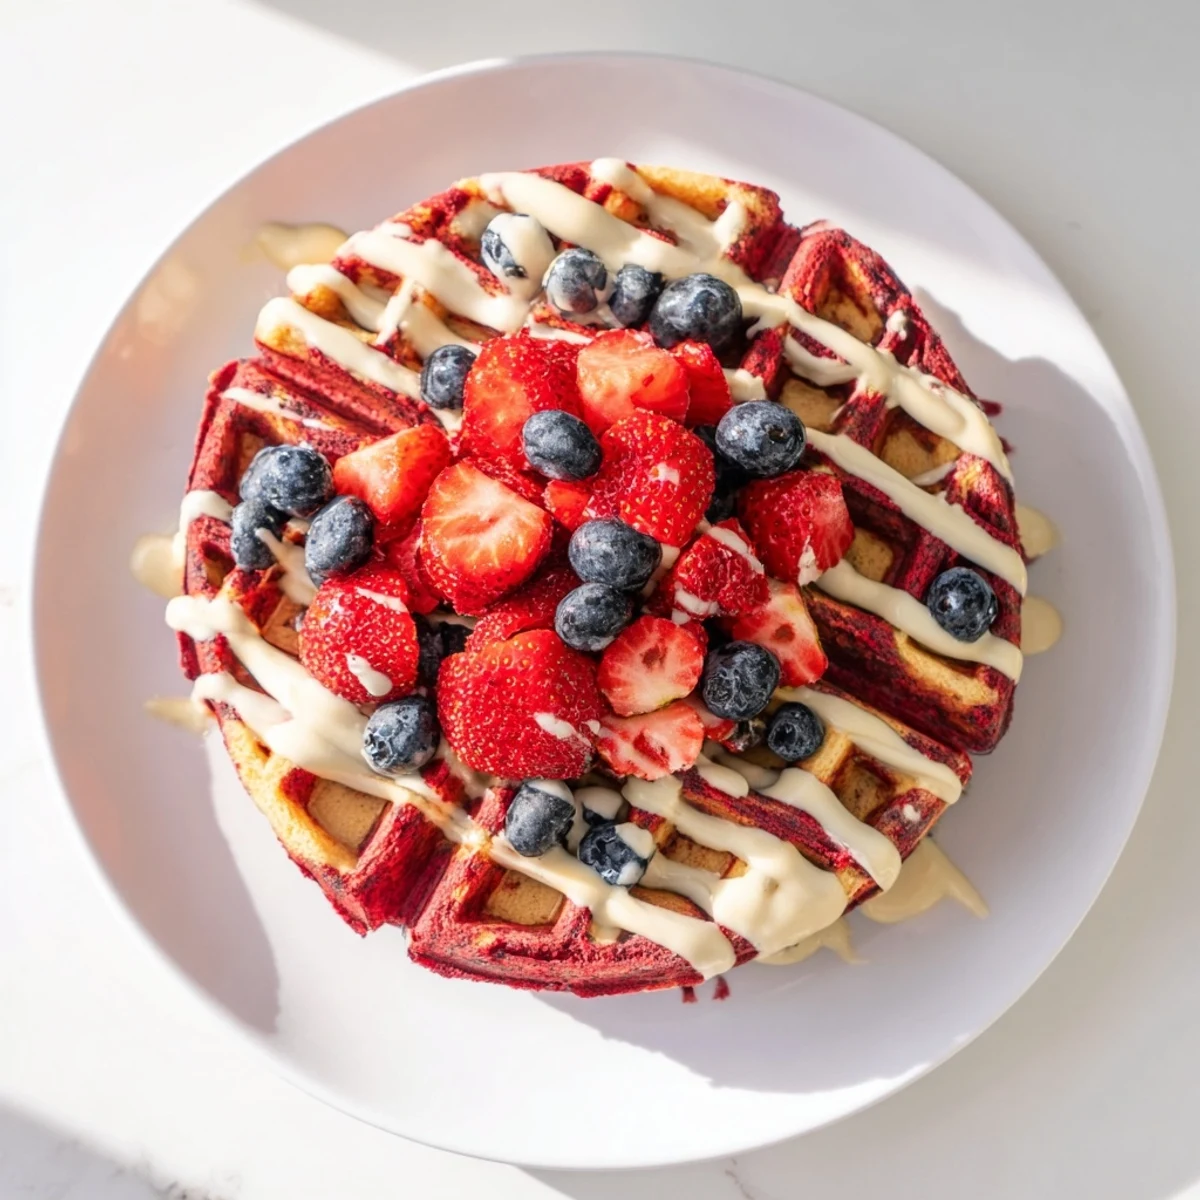
Save Create a stunning breakfast with these red velvet marble waffles that combine rich cocoa-infused red batter with classic vanilla. The beautiful marbled pattern looks impressive but comes together easily in just 30 minutes. Each crispy, golden waffle delivers the signature red velvet flavor everyone loves, while the vanilla swirl adds a delightful contrast that balances the chocolate notes perfectly.
The first time I made red velvet anything, my kitchen looked like a crime scene. Red food coloring has a way of splattering exactly where you do not want it to. But when those waffle irons hissed open and revealed those gorgeous swirling patterns, every paper towel sacrifice felt worth it. My daughter actually gasped, which is saying something for a teenager who is usually unimpressed by anything that is not delivered through a drive thru window.
My sister came over for what was supposed to be a quick weekend catchup brunch. She ended up staying for three hours just taking pictures of these waffles from every possible angle. Now every time she visits, there is an expectation. I have created a monster.
Ingredients
- 2 cups all-purpose flour: The foundation that gives these waffles their structure and perfect crisp edges
- 2 tbsp granulated sugar: Just enough sweetness to balance the tangy buttermilk without making these dessert
- 2 tsp baking powder and 1/2 tsp baking soda: The lift team that makes each waffle puff up beautifully in the iron
- 1 3/4 cups buttermilk: This is non negotiable for that classic red velvet tang and tender crumb
- 2 large eggs: Room temperature eggs blend better and help the batter achieve the right consistency
- 4 tbsp unsalted butter, melted: Butter adds flavor that oil cannot replicate, but let it cool slightly so you do not scramble your eggs
- 1 tsp vanilla extract: Pure vanilla makes the vanilla portion of these waffles sing
- 2 tbsp unsweetened cocoa powder: A little goes a long way to give that classic red velvet depth
- 1 tbsp red food coloring: Gel coloring gives a more vibrant red with less liquid, which keeps your batter consistency right
Instructions
- Whisk the dry ingredients:
- In a large bowl, combine flour, sugar, baking powder, baking soda, and salt until everything is evenly distributed.
- Mix the wet ingredients:
- In another bowl, whisk buttermilk, eggs, melted butter, and vanilla until the mixture is completely smooth and no streaks remain.
- Combine the batters:
- Gently fold the wet mixture into the dry ingredients just until combined, being careful not to overmix which can make waffles tough.
- Divide and color:
- Split batter evenly between two bowls. Mix cocoa powder and red food coloring into one bowl until completely blended, leaving the other bowl plain.
- Heat your iron:
- Preheat the waffle iron and lightly grease it with oil or nonstick spray to prevent sticking.
- Create the marble:
- Drop alternating spoonfuls of red and vanilla batters onto the center of the hot iron, then use a chopstick or butter knife to gently swirl them together.
- Cook to perfection:
- Close the lid and cook until waffles are golden and crisp, usually 3 to 5 minutes depending on your waffle iron.
- Serve immediately:
- These are best enjoyed hot from the iron with whatever toppings make you happy.
 Save
Save These became our Christmas morning tradition after one year when we were all too tired to make a big fancy breakfast but still wanted something special. Now it would not feel like the holidays without red streaks across our plates.
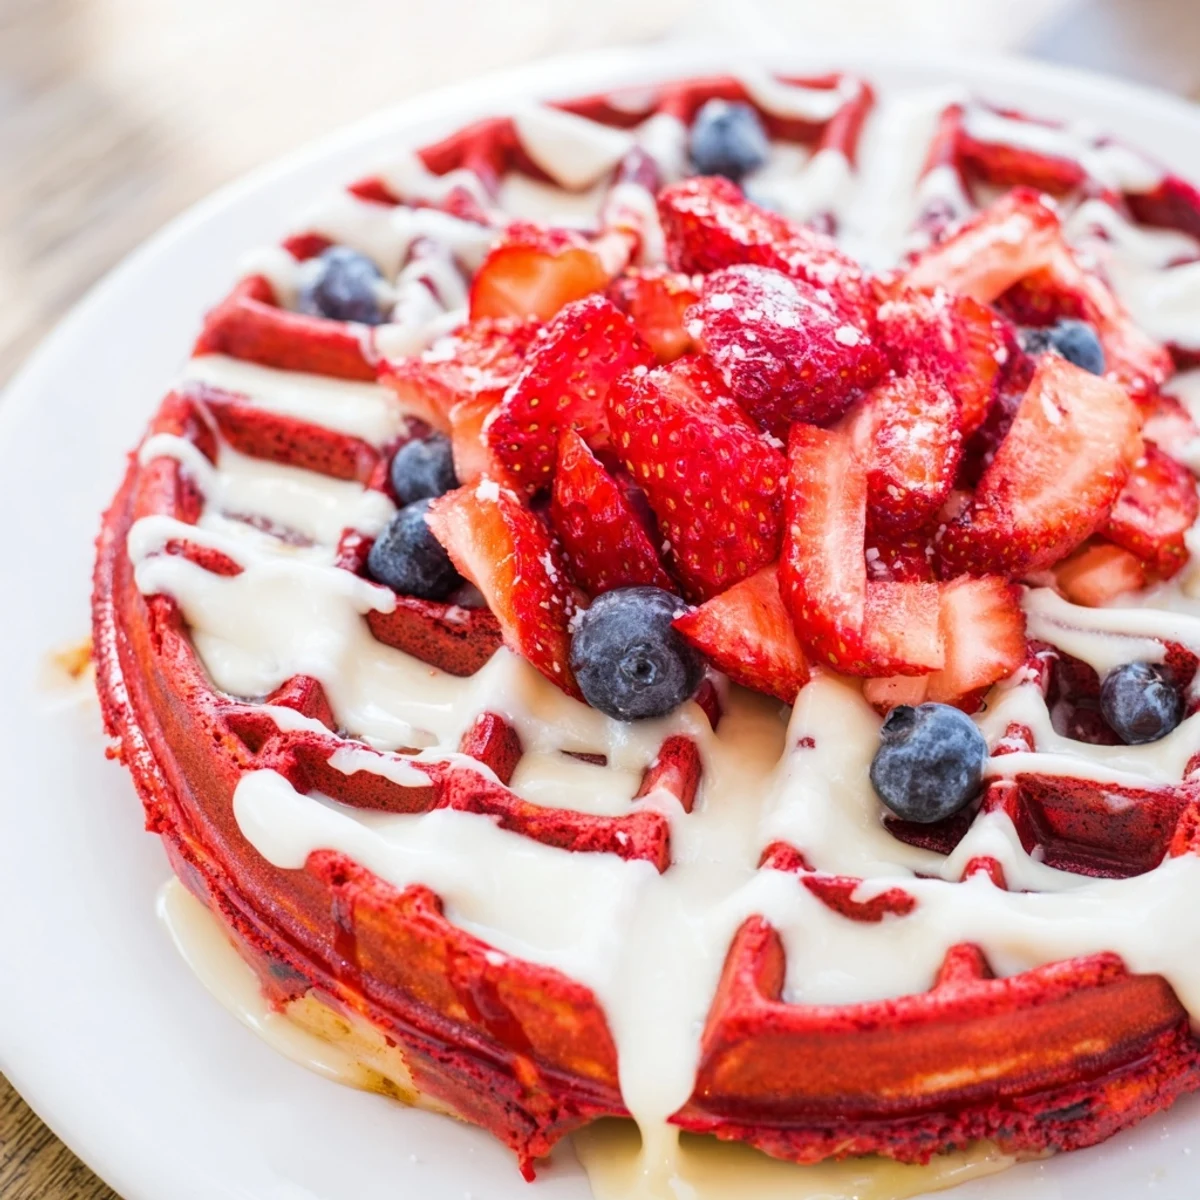
Mastering the Marble
The secret to getting those dramatic swirls is not overthinking it. Drop the batters in alternating spoonfuls rather than trying to pour them perfectly. When you run your chopstick through, just two or three gentle figure eights are enough to create the marble effect. Too much swirling just blends everything into a muddy pink batter that still tastes great but loses the wow factor.
The Perfect Toppings
A cream cheese glaze takes these completely over the top in the best possible way. Just mix softened cream cheese with a splash of milk and powdered sugar until it reaches drizzling consistency. Sometimes I add a drop of vanilla extract to the glaze for extra depth. Fresh berries provide a tart contrast that cuts through the richness beautifully.
Making Ahead
While these waffles are undoubtedly best fresh, you can freeze leftovers for busy weekday mornings. Let them cool completely on a wire rack first so they do not get soggy, then freeze in a single layer before transferring to a freezer bag. Reheat in the toaster oven to restore that exterior crispiness.
- Pop frozen waffles directly into the toaster oven, no thawing needed
- Store leftover batter in the fridge for up to 24 hours if you want fresh waffles tomorrow
- The marble effect actually gets more pronounced as the batter rests overnight
 Save
Save There is something joyful about cutting into these and seeing those swirls, like breakfast decided to dress up for a party. Simple pleasures are often the best ones.
Recipe FAQs
- → What creates the marble effect in these waffles?
-
The marble effect comes from layering alternating spoonfuls of red velvet batter and plain vanilla batter onto the waffle iron, then gently swirling them together with a chopstick or knife before cooking.
- → Can I make the batter ahead of time?
-
Yes, you can prepare both batters the night before and store them separately in airtight containers in the refrigerator. Give each batter a quick stir before using, as they may thicken slightly overnight.
- → What toppings work best with red velvet waffles?
-
Cream cheese glaze is the classic pairing, but these waffles also shine with maple syrup, fresh berries, whipped cream, or even a dusting of powdered sugar for a beautiful presentation.
- → How do I know when the waffles are done?
-
The waffles are ready when they're golden brown and crisp on the outside, typically taking 3-5 minutes depending on your waffle iron. Most models have an indicator light that signals when cooking is complete.
- → Can I use natural food coloring instead?
-
Yes, beet juice or pomegranate juice can provide natural red coloring, though the shade may be more subtle than gel or liquid food coloring. Start with 1 tablespoon and add more for deeper color.
- → What can I substitute for buttermilk?
-
Greek yogurt thinned with a little milk works well, or make a quick buttermilk substitute by adding 1 tablespoon of vinegar or lemon juice to regular milk and letting it sit for 5 minutes.